
Technical File of EWD-RL-TJ2 Elevator Weighing Device [System Introduction]
(V2.2)
page1 of 30
User’s Guide
EWD-RL-TJ2
(V2.2)
Xi'an Excellent Electromechanical Co., Ltd.

Technical File of EWD-RL-TJ2 Elevator Weighing Device [System Introduction]
(V2.2)
page2 of 30
Table of Contents
Product Overview
1、Main features
……………
Page 3
2、Product appearance, display and Port description
……………
Page 3
Sensor selection and installation
3、Weighing device debugging under other circumstances
……………
Page 4
System Adjustment
4、Sensor selection and installation
……………
Page 5
5、System Adjustment
……………
Page 5
Promise and Others
6、Technical Specifications
……………
Page 6
7、Description of Other Indication States
……………
Page 7
promise
……………
Page 7
Other
……………
Page 8
Attached(Load sensor dimensions
and installation)
……………
Page 9-10
● Declaration:
In any case, our part is only responsible for the product own quality within the warranty
period.
Description
:
1.State Indication - Flickering:About “Once per Second”;
2.Button Operation
-
Press
:
Press and release soon
;
Hold
:
Press constantly
;
3.Relay - Keep the state of Picking-up in the period of system being .

Technical File of EWD-RL-TJ2 Elevator Weighing Device [System Introduction]
(V2.2)
page3 of 30
Main Features:
1.The system is of the structure of sensor with the domination of loading cell and controller, which can
be installed at the car-side rope hitch;
2. Directly outputting full-load or overload signal depending on the change of elevator car payload
;
3. Simple adjustment, high precision of measurement and quick and easy installation.
Product Appearance, Installing Method and Relevant Structure
Description
PG
Connect load sensor
Button, use for adjust
Status
indication
L0
No adjust(No-load self-learning)
J0
Load <90%Rated load(J1,J2 relay is
released)
J1
Load ≥90%Rated load(J1 rated relay is
closed)
J2
Load>100%(J2 rated relay is closed)
PJ.1~3
J1 Full load output
PJ.4~6
J2 over load output
PJ.7~8
System power supply DC24V/100mA

Technical File of EWD-RL-TJ2 Elevator Weighing Device [System Introduction]
(V2.2)
page4 of 30
● Weighing device debugging under other circumstances:
If the following reasons occur, the working parameters of the weighing device need to be revised again.
The modification method is the same as above.
1. The elevator changes the decoration of the car, so that its self-weight changes;
2. The pull of the wire rope appears large imbalance phenomenon;
3. The phenomenon of rushing to the top and squatting to the bottom;
● Sensor selection and installation:
Load sensor
Model
Description
Size and install method
XCL-YL-C
Type "C" load sensor
See attached page

Technical File of EWD-RL-TJ2 Elevator Weighing Device [System Introduction]
(V2.2)
page5 of 30
System Adjustment:
Yes
Yes
Yes
State Indication of
〖Lo〗
Reset to Default State
After power on ,
press【◎】to turn on.
Release 【◎】 after
〖PP〗indicating for
10 seconds later
display 〖 Pn 〗
system will be reset
to default state
Press【◎】,display〖Pn〗, show 〖PL〗will flicker for 6s,which means the end of No-load Autotuning.
No
1. After proper installation of this device and
check of no error,turn on the system.
2. Stop the elevator at the bottom floor and l
et the car be of no load.
Yes
Indicating〖PH〗,i.e. entering “Rated load Autotuning”
Load 100% of Rated Load. E.g.for an elevator with rated load of 1ton,load 1000Kg is OK.
Press
【◎】,
display
〖Pn〗later,show 〖
PH
〗
flickers, which means the end of Rated Load
After the system debugging is completed, during normal operation, press and hold [
◎
],
〖
J1
〗
/ J2
〗
alternately flashing, while J1 / J2 alternately output.

Technical File of EWD-RL-TJ2 Elevator Weighing Device [System Introduction]
(V2.2)
page6 of 30
Yes
Return to normal working condition
Load multiplier parameter modification operation: (unlearned system is required to operate)
Technical Specifications:
⒈
Application
Range
Suitable for all traction, hydraulic, strong drive elevator use (load range depends on
sensor range)
⒉
Sensitivity
For the elevator with rated load of 1 ton, it is 5Kg
⒊
System Error
≤1.5%(5~40℃)
⒋
Output Mode
Switching Signal : Full-load and overload Dynamic Close and Dynamic Open
contact
1. system Power off;
2. press【◎】power-on,show〖PP〗released:(Note:press 【◎】10 Seconds,over Seconds system will clear the
existing data back to the factory state)
3. During Show〖Pd〗and 〖01〗enter Full load、over load Multiplication mode,and show number〖01〗is the multiplier
of the rated load.
4. During show 〖01〗flicker,press【◎】,Multiplication will increase,until〖30〗 later,Will loop back〖01〗Start
to increase again。After reaching the desired multiplier, press 【◎】,keep 2-3 seconds,display〖Pn〗Remember
and save the value,Into normal mode of operation.
(exp:For already has the amount of memory learning1000Kg elevator, 〖Pd〗The parameter is modified to05,choose
5 Multiply,full load 90%x5000Kg;over load 100%x5000Kg;)

Technical File of EWD-RL-TJ2 Elevator Weighing Device [System Introduction]
(V2.2)
page7 of 30
:Intensity exceeding the above listed parameter limits may cause the system abnormality or its
permanent damage.
● Description of Other Indication States:
Display
Code
Implication
Solution
1
YS
System Start up
2
PC
Sensor Resetting
3
PP
Get into the status of operation parameters modification
4
Lo
Ready for Auto tuning Operation
5
PL
No payload is detected by sensor
(Static Displaying represents preparative status
,
twinkling displaying for the end of testing)
6
PH
Self - learning parameters
7
Pn
Memory is complete
Promise
1. If this system appears any quality problem of product itself in 1 year after delivery, it will be replaced
freely
(
damage of the product seal will not be dealt with
)
.
2. Any system abnormality in adjustment or operation, please contact our company directly.
⒌
Operation
Temperature
-20~55℃)
⒍
Power Source
DC 24V(±10%)
,
Operating current for the whole set≤100mA

Technical File of EWD-RL-TJ2 Elevator Weighing Device [System Introduction]
(V2.2)
page8 of 30
Others
1.Packing List:
Elevator Overload Device Controller EWD-RL-TJ2 1PCS
Load Sensor and its accessories 1SET
Screw Sets M4 X 40 2SETS
System Instruction Manual 1PCS
2.Address book
:
Xi
’
AN EXCELLENT ELECTROMECHANICAL CO.,LTD
:
(029)88416613,18092639750
18092639752
:
7D
,
Block A, Olympic Building, 14th Ch
ang An North Road, Xi'an, Shaanxi,China

Technical File of EWD-RL-TJ2 Elevator Weighing Device [System Introduction]
(V2.2)
page9 of 30
160
136
4-Φ8.5
15
10
2-M6
14
40
2013.5
Attached page:
1
、
XCL-YL/C sensor size and installation position diagram and installation precautions
1、Sensor size diagram:
Force transfer plate size:
45
10
50
20
12
2-M8
12
M5
1.5×45°
1.5×45°
Technical File of EWD-RL-TJ2 Elevator Weighing Device [System Introduction]
(V2.2)
page10 of 30
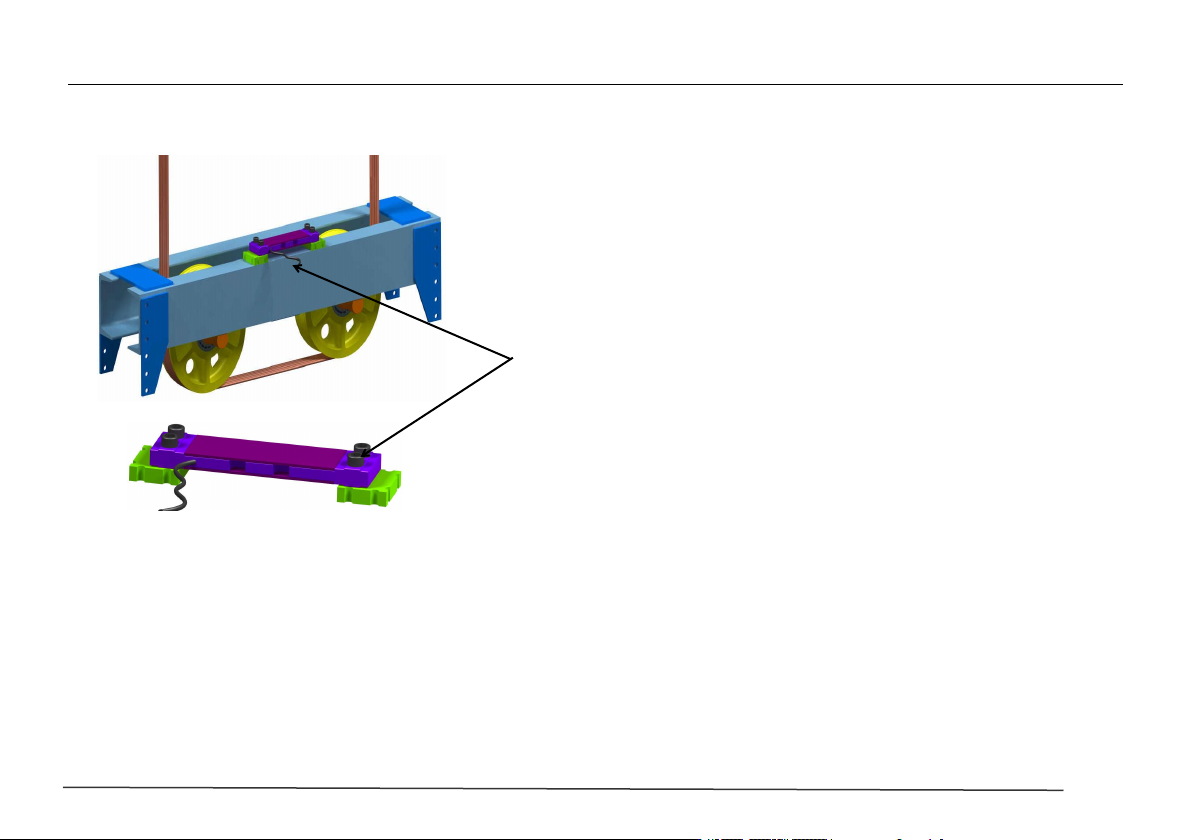
2.Installation Method:
3. Precautions for installing the controller and sensor:
3.1 The controller part should be installed in the control box on the
top of the car, and it is better not to be close to the elevator
electronic weighing device transformer, governor and other
equipment. In all cases, sensors and controllers shall be installed
away from heat sources;
3.2 "C" type sensor The sensor is installed above the bearing beam,
and the connection between the controller is better than 110V, 220V and other power supply in the same wiring slot;
3.3 Connect the sensor wiring port to the PG port of the controller, and connect PV to the power line according to the
requirements of the weighing device. Be sure to pay attention to the voltage level;
3.4 Power on the weighing device after the check is correct, and the controller shall be displayed in the corresponding
working mode.
The green part is welding accessories,
tatally 2, each "left , right, back" 2
welding points; The user can weld the
Fukien with the load-bearing beam.
